
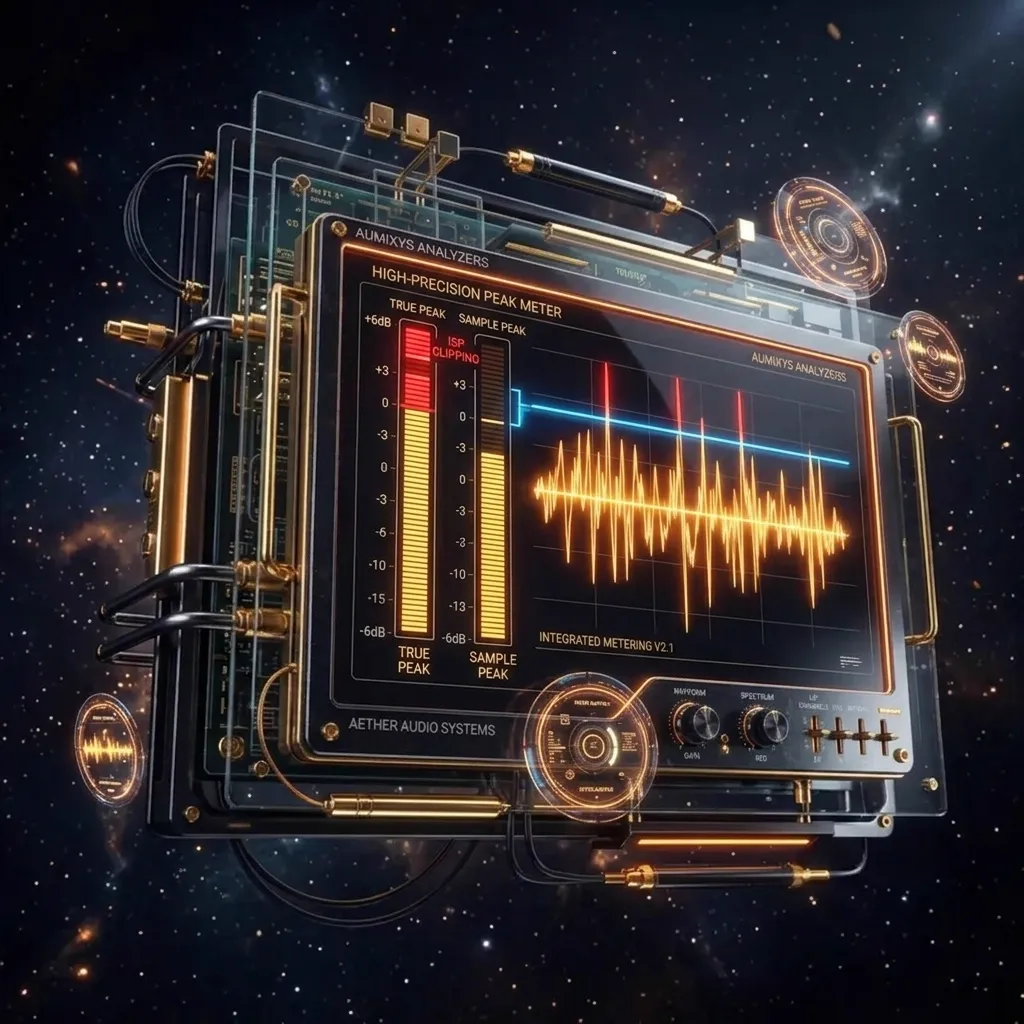
Sample Peak and True Peak answer different questions
Sample Peak is the highest individual sample stored in the digital file. This is what a regular DAW peak meter shows: if no sample crosses 0 dBFS, the file looks digitally safe.
True Peak asks the harder question: how high can the real reconstructed waveform get between samples after oversampling, D/A conversion or lossy encoding? That is why True Peak is reported in dBTP, not only dBFS.
This distinction matters because an audio file is not played back as isolated dots. The converter and the codec reconstruct a continuous waveform. That waveform can rise above the highest stored sample, even when the DAW meter shows a calm -0.1 dBFS.
Where inter-sample peaks come from
Digital audio is often imagined as a staircase, but that picture is misleading. During playback, samples are used to reconstruct a continuous waveform. If several neighboring samples sit very close to zero, the curve between them can briefly rise above the highest stored sample.
This is an inter-sample peak (ISP). It appears most often in very loud masters, heavy limiting, clipping, high-frequency saturation, sharp cymbals, sibilance, loud bass after limiting or material pushed almost to 0 dBFS.
A 0.2 dB gap between Sample Peak and True Peak can be cosmetic. A 0.8-1.5 dB gap means the limiter, clipper and transients deserve closer inspection. If True Peak crosses 0 dBTP, the master can clip after reconstruction even when no stored sample exceeds 0 dBFS.
Why Spotify, Apple Music, YouTube and AAC can make it worse
Streaming platforms usually do not play your WAV file directly. The file is prepared for different formats and qualities, such as AAC, Ogg Vorbis or Opus. Lossy encoding changes spectrum, phase and waveform shape, so peaks after compression can be higher than in the source file.
If a master has a Sample Peak around -0.1 dBFS and True Peak near 0 dBTP, it can clip after transcoding. It looked safe on paper, but after delivery it may produce harshness, transient crackles, brittle cymbals or aggressive vocal top end.
Spotify's own guidance recommends keeping a master below -1 dBTP, and if the master is louder than -14 LUFS Integrated, it recommends a larger margin below -2 dBTP. The reason is simple: the hotter the master, the less room the codec has to reshape the waveform.
What True Peak level is safe?
There is no single perfect number for every track, but a sensible streaming starting point is -1.0 dBTP. For very loud masters, especially above roughly -14 LUFS Integrated, it is safer to leave more room, for example around -2.0 dBTP.
The goal is not to turn every master down too much. The goal is safety margin for the codec, playback device and waveform reconstruction. If the song is quiet, dynamic and low in LUFS, -1 dBTP is usually enough. If it is loud, bright and heavily limited, -0.3 dBTP may be too close to the edge.
Why a limiter can still leak distortion
A limiter set to a 0.0 dBFS ceiling mainly watches samples. If it is not running in True Peak mode, if its oversampling is too low, or if it is being fed hard by a clipper, it can still let inter-sample peaks through while the DAW output meter looks clean.
The second problem is processing order. If the limiter has a safe ceiling but you add saturation, a bright EQ boost, stereo widening or sample-rate conversion after it, True Peak can rise again. That is why the final measurement should be made after exporting the finished file, not only on the project master bus.
In practice, it is safer to set the limiter ceiling to -1.0 dBTP or lower and enable True Peak mode/oversampling if the limiter offers it. Oversampling helps, but it is not a magic guarantee: an overly aggressive limiter can still sound rough even when the number is technically legal.
How True Peak problems sound
True Peak is a technical measurement, but its results can be audible. Not every inter-sample peak creates dramatic distortion, yet loud masters often reveal the symptoms in specific places.
- Crackles on transients: kick, snare, clap or a strong pluck sounds like it has a short digital click.
- Rough top end: cymbals, sibilance and bright vocals become tiring after encoding or on headphones.
- Flattened attack: the track is loud, but drums do not hit; the limiter turns punch into a constant wall.
- Export mismatch: it sounded acceptable in the DAW, but the rendered or uploaded file becomes sharper.
- Only the chorus breaks: True Peak rises where kick, bass, cymbals, vocal and wide layers meet.
The most useful test is a loudness-matched comparison. If the version with a lower ceiling and lighter limiting sounds just as loud after gain matching but has less harshness and more attack, the previous version was probably pushed too hard.
What to fix when True Peak is too high
The simplest move is lowering the ceiling, but it is not always the best musical fix. If only a few moments cause the problem, controlling the source before the limiter is better than turning the whole song down.
- Reduce clipper or saturation drive: aggressive clipping often creates new sharp components that raise True Peak.
- Control transients before the limiter: a single kick or snare may need automation, a transient shaper or soft clipping on the bus.
- Check bright ranges: 5-12 kHz can push peaks after encoding, especially with cymbals and sibilance.
- Tighten the bass: low-frequency amplitude eats headroom and forces the limiter to work harder.
- Use a True Peak limiter: enable True Peak mode and oversampling, but still measure the exported file externally.
- Compare -1 dBTP and -2 dBTP versions: with loud material, the quality improvement is often larger than the perceived loudness loss after normalization.
A simple pre-release workflow
- Export the final WAV/FLAC: measure the finished render, not only the DAW mix bus.
- Compare Sample Peak with True Peak: the difference shows the inter-sample peak margin.
- Check the loudest sections: chorus, drop and final hook usually reveal the problem faster than the intro.
- Set a sensible ceiling: usually around -1 dBTP, and closer to -2 dBTP for very loud masters.
- If True Peak exceeds the limit: inspect the limiter, clipper, saturation, bright transients and bass before the limiter.
- Render again: after every correction, measure the new file from scratch because the DAW project is not the final proof.
- Listen with gain matching: decide whether the correction improved quality, not only lowered the number.
How Aumixys helps control True Peak
Aumixys shows True Peak, Sample Peak, LUFS, LRA, Crest Factor and Auto-QC diagnostics together. This makes it easier to separate ordinary digital peaks from real reconstruction or transcoding risk.
- True Peak max: shows the highest predicted peak after waveform reconstruction.
- Sample Peak: reveals whether the problem is already in the samples or only between them.
- LUFS and Crest Factor: show whether the master is merely loud or also overly flattened.
- Auto-QC: helps catch warnings such as high True Peak, low headroom or clipping risk after encoding.
- A/B Compare: helps test whether the version with more headroom actually loses energy, or simply sounds cleaner after loudness matching.
Sources and standards
ITU-R BS.1770 - loudness and true-peak measurement EBU R 128 - loudness normalisation EBU Tech 3341 - loudness metering Spotify for Artists - Loudness normalization Apple Video and Audio Asset Guide - delivery requirementsFrequently Asked Questions (FAQ)
What is the difference between True Peak and Sample Peak?
Sample Peak measures the highest stored sample in the file. True Peak estimates how high the reconstructed waveform can rise between samples, after D/A conversion or lossy encoding.
What True Peak should I leave for streaming?
A practical starting point is around -1.0 dBTP. For very loud masters, especially louder than -14 LUFS Integrated, it is safer to leave more headroom, for example around -2.0 dBTP.
Why does the limiter show 0 dB but clipping appears after upload?
A limiter may be watching stored samples rather than peaks between them. After transcoding to AAC, Ogg or Opus, the waveform can change and raise True Peak, especially in loud, bright masters.
Is enabling a True Peak limiter enough?
It helps, but it is not a guarantee. If you add EQ, saturation, widening or sample-rate conversion after the limiter, True Peak can rise again. Measure the final exported file.
How do I fix high True Peak without ruining the master?
Check the limiter, clipper, saturation, bright transients and bass before the limiter first. Often it is better to reduce drive or control a few transients than simply turn the whole master down.
Check it on your track
See inter-sample peaks and confirm that your master has safe headroom before encoding.